You don’t necessarily have to dedicate a computer just to set up your own router. I’ll show you how it’s possible to get a fully functional router in a virtual machine using Untangle. To get this straight – we will be running a router on our computer (through VM) that’s actually protecting the same computer. Here’s an example.

A few years ago, this may have not been worth the effort to set up… but now with processing power, massive amounts of RAM, and huge disk space – it’s the perfect opportunity. This probably isn’t something you will want running (long term) for your full network. It’s just a fun experiment to see what’s running on the network – all without having to dedicate a PC.
What you need
A computer with great hardware – capable of running Untangle in VirtualBox (I’m using an Intel i7 with 12GB of RAM). It’s recommended you have at least 2GB for Untangle.
3 network ports (my motherboard has 2 ports and I installed an extra NIC).
3 network cables (lengths vary to your specifications).
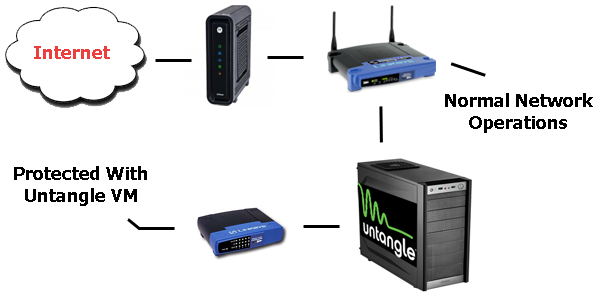
You may want an extra network device such as a router or switch. You will need this to choose what will be behind the Untangle firewall because if you shut down the virtual machine or your computer, those devices will no longer have an internet connection.
Last item – Oracle VM VirtualBox. I use this because it’s free, easy to use, and honestly – I’m just used to it.
Setting up
Once you have everything, you need to figure out how you want to set up your home network. For example, I have my computer (the one running Untangle) behind my gateway router to ensure there’s always a connection for other devices on the network. Then if you have a network switch, you can have select devices running behind the firewall (from your computer). It’s up to you – just experiment and have fun with it.
After setting up the network, you can begin setting up the virtual machine. Before installing Untangle, you must first enable two network adapters as bridged adapters. Two of your network cards will be dedicated to Untangle – these will be the in/out connections. Your third network adapter will be for your computer’s connection. This is why 3 connections are necessary.
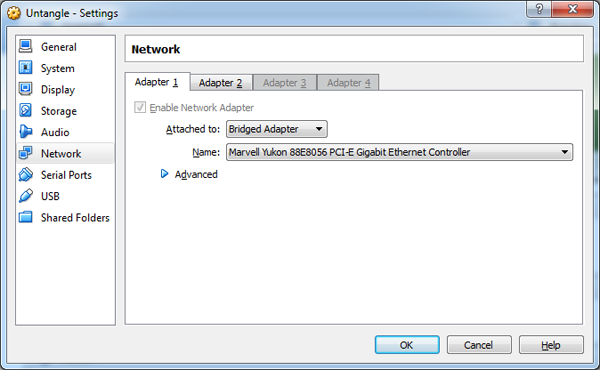
The Untangle connection can be ran through a switch/router running only what’s wanted behind it. Plugging the third connection into the switch will allow that same computer running virtual machine to be behind Untangle.
One thing that’s a plus running in VM is choosing our own disk space. If we were running on a dedicated machine, we might have to worry about partitioning – if at all. A waste of disk space if you ask me… Depending on the size of your network, Untangle really doesn’t need much disk space. I set mine to about 10GB and it’s been more than enough.
Other than disk space, RAM can be a big factor here. Untangle requires at least 2GB – and you need it. If you can supply more, you can try it out… but two seems to do the job just fine.
One last thing to note here – in this case, it’s easier to have Untangle as a transparent bridge (this is chosen during installation).
Other notes
This isn’t something that you might want running long term. Although, technically – it could be. Some simple reasons are – if you shut down the computer or virtual machine, the network behind Untangle loses connection. Plus, when starting up and shutting down the computer – you must start/stop the virtual machine manually. I have been using it like this for a couple of months and those are some of the nuisances to deal with.
One other thing that personally drives me crazy – you can’t close the window to the virtual machine running unless you want it shut off completely. I really wish Oracle would let you close (hide) the VMs running.
Configuration and setup can be found on wiki.untangle. If you do not know how to install, check out How to Install Untangle.
Visit Oracle to download Oracle VM. For Oracle VM support, visit the VM documentation.